Showing posts with label techniques. Show all posts

Thursday, 12 July 2018

At the Convention

Last weekend, I was at the Knitting & Crochet Guild's annual convention, this year at the University of Warwick.

2018 is the Guild's 40th anniversary, so of course we had a birthday cake.


Because of the anniversary it was a very special convention. Sasha Kagan, who is one of the Guild's patrons, gave the keynote speech.  Another speaker was Pauline Turner, a founder member of the Guild, a pioneer of crochet, and the 2018 inductee into the Crochet Guild of America Hall of Fame.

We had half-day workshops on Saturday and Sunday, led by Guild members.  Another of our patrons, Debbie Abrahams, taught a workshop on finishing techniques.  I didn't manage to get to that - there were a lot of enticing workshops on offer.  On Saturday, I did a workshop on making a tiny version of Elizabeth Zimmerman's baby surprise jacket, either crocheted or knitted.  The idea was that after trying it out on a small scale, we would be able to make a bigger one, maybe with some variations. Here are the ones we made in the workshop - mine is the one at the bottom.


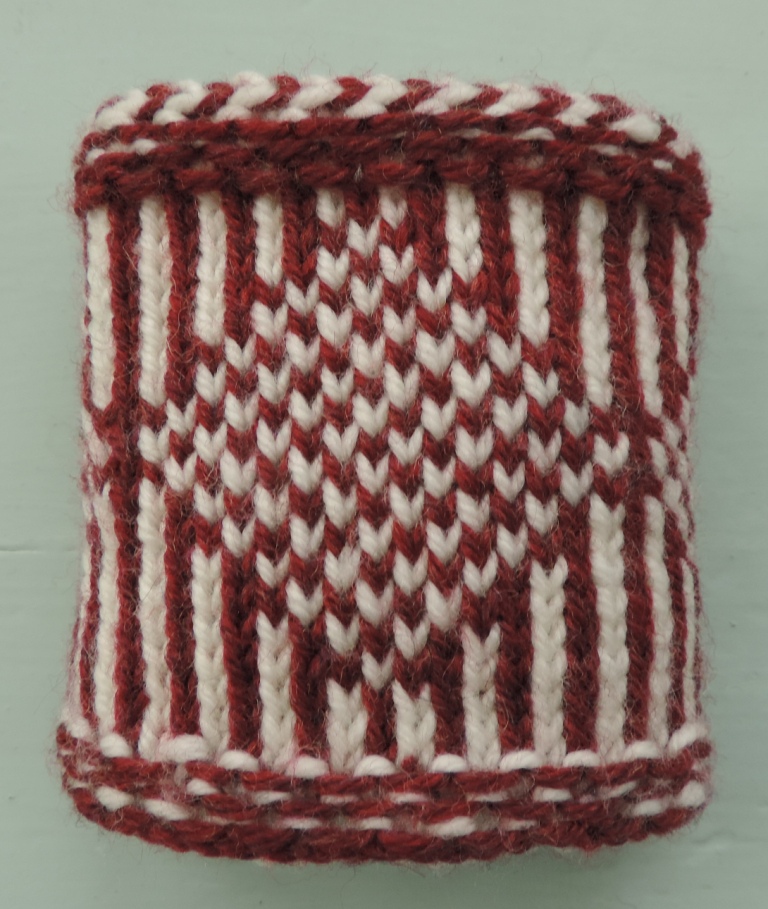
The workshop I went to on Sunday was on Estonian colour work knitting, taught by Rachel Lemon. Here is the sample I knitted (finished off on the train home, so if I got anything wrong at that point, it's because Rachel wasn't on hand to consult).


It was fascinating - very unlike other stranded knitting I have tried, because it has a lot of texture from using purl stitches.  The bands of stranded knitting are separated by braids, too (narrow raised bands of knitting) - I was particularly intrigued by the vikkel braid, which is the band of navy and white arrowheads pointing to the right, towards the bottom.  Difficult to grasp at first, but OK with some help.  Impossible to imagine how anyone could invent it.

My  workshop knitting was sort of intended to be one of a pair of cuffs or wristlets, but it's not good enough for that - it's just a practice piece. (Also, it's very difficult to get my hand through, which is rather a disadvantage for a cuff.)  I do intend to explore Estonian knitting further though. 

Kaffe Fassett is also a patron of the Guild, and although he wasn't available, he did send a lovely stole knitted in Kid Silk Haze, to be raffled.  And on Friday, before the start of the convention proper, Brandon Mably taught a one day workshop on using colour.  I attended it and it was amazing - I've never been very adventurous about putting colours together, and the workshop led me to look at combining colours in a different way.  Brandon showed me that startling colour mixes can sometimes work very well, and may not appear at all startling from a short distance.  And sticking to 'tasteful' and safe colour combinations risks looking just dull.

Here's the swatch I knitted in the workshop:


The first poppy, at the bottom, seems a mix of soft yellows and greens, but in fact one of the yellows, picked by Brandon from my neighbour's collection of wools, is a really bright lime yellow. In the mix with the other colours, though, it perks them up without being overwhelming.  Further up, there's a bright blue among the dark shades that has a similar effect.

Here are the swatches that the workshop participants knitted during the day, still on the needles at the end of the workshop. (Mine is the one at the top left.) It was wonderful to see the beautiful results that everyone produced.


This is an approach to using colours that I really want to explore more - it feels so exciting. Unfortunately, as a side-effect, it did also make me feel like buying lots of different colours of wool, immediately.  So I'm not quite sure yet how to proceed.  Because I don't need more wool.

Saturday, 23 December 2017

Fluffier on the inside

On Thursday evening, we had the December meeting of the Huddersfield Knitting & Crochet Guild branch.  Our theme for 2017 has been Yarn, in all sorts of forms.  To finish the year we had a workshop from one of our members, Sarah Alderson of Aldersign Designs.  The workshop was on thrumming - a traditional technique from Canada for making very warm mittens and such like by knitting extra bits of unspun wool into them to make a fleecy lining.  (Search for 'thrummed mittens' to find some YouTube videos and articles - here's one by the Yarn Harlot.)

Sarah provided us with undyed wool tops to make the thrums - short lengths of roving folded into figure-of-eight loops.  And she had designed a pattern for thrummed slippers / bootees - the design is called 'Fluffier on the Inside'.   The sole of the slipper is thrummed, and there is another band of thrumming around the ankle.  Sarah's prototype was in dark blue, and looks a little bit like Doctor Who's Tardis (which of course is bigger on the inside).

We started with a slipper sole, and I finished mine on Thursday evening.  The photos show the outside, with a neat pattern like the lice in Norwegian knitting:


and the inside, which looks like an explosion in a wool warehouse:


Sarah says that after the slippers have been worn for a while, the thrums felt together into an even, very warm layer.

The next step in making the slippers is to pick up stitches around the edge of the sole to knit the upper (which isn't thrummed).   Before doing that, I think I should knit the sole again - the size needs some adjustment.  And before that,  I need to finish off some Christmas knitting - there's not much time left, but it may just be done by Christmas morning.  But I shall definitely finish the slippers - they will be so cosy.

Saturday, 15 July 2017

Guild Convention in Birmingham

It's been a busy week, so I am only just getting around to writing about the Knitting & Crochet Guild Convention which was in Birmingham last weekend.  The Convention is an annual event, though Birmingham is a new venue.

On view was the Guild's display for this year's shows, on the theme of 'Passing on the Passion'.


It features a few items from the Guild collection, including a Kaffe Fassett 'Foolish Virgins' jacket, a crocheted top from C&A, and a knitted crown.

That's one of the very few photos I took at the Convention - I was too busy knitting most of the time.  (I bought some Rowan Felted Tweed in John Lewis, and started knitting a Heidi Kirrmaier cardigan, but that's another story.)   I also spent some time looking around the centre of Birmingham - it's not a city I know well.  The hotel was in the Chinese Quarter, with the Bull Ring markets nearby.  Around the corner are the National Trust Back-to-backs, which are fascinating.  Several of us who arrived a day early for the Convention went on a tour.

And I spent a lot of time in the Museum and Art Gallery.  It has wonderful collections, including a new display of the Staffordshire Hoard, which is amazing (and very difficult to photograph through the glass cases - I tried).

At the Convention, as well as the Guild's AGM, we had three very good talks.  Betsan Corkhill, of Stitchlinks, talked about the role of knitting in healthcare.  The second talk was by Emma Price of In the Woolshed, which produces natural dyed yarns.  She talked about her career to date, initially alternating between accountancy and spending time in India with people practising traditional crafts, before starting In the Woolshed.  She now also leads textile journeys to India.  And finally, Denise Musk, a life member of the Guild, brought along some of her machine knitted garments in amazingly complex fabrics, and talked about how they developed from her initial ideas.

As well as the talks, there were two workshop sessions led by Guild members, with six topics on offer in each session.  But I skipped one session in favour of the Staffordshire Hoard and Pre-raphaelite paintings, and so only did one workshop.  It was on Moebius Knitting, with Fiona Morris.  Fiona brought along some very inspiring samples, and taught us how to cast on - a surprisingly quick technique.  I didn't get very far past casting on in the workshop, though I did finish one round and I've subsequently done a few more.


It's very satisfying for anyone with a mathematical background that it is a genuine Moebius strip, with one edge and one surface.  But my sample isn't very tidy and I'd like to do more practice and then try one of the very nice cowls that Fiona showed us.

I contributed to the Convention, too.  There was a 'show-and-tell' session on Saturday evening, when members could show something they made during the past year.  I took the summer scarf, started in April, which is now finished - I'll write about that later.  And Maureen and I did a short presentation on 'How to do a Trunk Show'.  I had brought two items that haven't previously featured in trunk shows and talked about them - but those are two more stories for the future.

Friday, 21 April 2017

Knitting with beads


I've just finished this beaded wristband, started yesterday evening.  We had a workshop on knitting with beads, at the Huddersfield branch meeting of the Knitting & Crochet Guild.  The workshop was taught by Marie, who had designed the lacy wristband as a quick knit for us to learn on.  She showed us two well-known techniques (well-known even to me, and I had never tried beading before) - first, threading the beads onto the yarn before you start knitting, and second, using a very fine crochet hook to attach each bead.  But the technique we actually used was a new one, which uses dental floss - of a particular type (Oral-B Super Floss, to be exact).  The floss comes in handy lengths and, crucially for beading purposes, each length has a stiffened section at one end that you can thread through a bead. It's a really clever way of adding a bead to a stitch, and looks much easier to do than the other two techniques.  There are tutorials on YouTube explaining how to do it: you can search for "super floss beading".

It was a very well prepared workshop - Marie supplied suitable yarn (wound into neat little centre-pull balls), dental floss and beads, as well as the pattern she had designed.  And she had threaded enough beads for the wristband onto a length of dental floss for each of us.  (On the other hand, I wasn't well prepared at all - the one thing we had to supply for ourselves was knitting needles, and I had forgotten.  Luckily a friend had a spare circular needle with her of the right size, and lent it to me.   
Here's my wristband in progress:


And here's the dental floss with beads threaded onto it:


Thanks very much to Marie for all the work she put in, and for a fascinating workshop.

Monday, 13 February 2017

Mitts in Twined Knitting

I said last month that I was knitting a pair of fingerless mitts in twined knitting - all inspired originally by somehow volunteering to do a workshop in twined knitting for the Huddersfield Knitting & Crochet Guild.  (I think I might have been hypnotised.)  I finished those mitts, which I intended to be for me, but then someone asked me to write the pattern, and I decided that if I was going to do that, I'd like to change it a bit.  So I gave the first pair to my daughter, and made another pair for me.

The wristlets I designed as the workshop project were knitted in two colours - you switch colours for (almost) every stitch, twisting the yarns each time.  For the mitts, I used two strands of the same colour, again alternating the strands for each stitch.  (That's the original use of twined knitting, I believe - it's called two-end knitting in Swedish, and  you can use both ends of one ball of yarn.)    

Here are my second pair of twined knitting mitts:


I'm calling the design Aspen, because the diamonds on the back of the hand and the cuff reminded me of the diamond shapes on the bark of aspen trees at Harlow Carr garden in the autumn - and aspen trees grow in Sweden, where twined knitting also comes from.  

Twined knitting gives a very nice texture.  Apart from the areas of pattern, it looks similar to stocking stitch on the right side, but actually it feels slightly ridged.  (Taking one strand across the back as you knit a stitch with the other strand pulls the fabric in a bit and makes the right side of each stitch tighter than the left.  At least that's what happens when I do it.)  


And the wrong side looks very different to stocking stitch:

 
Susie's mitts are only slightly different to mine:

 
They have chevrons on the cuff, and the border to the thumb gussets is a bit different.  I've taken the elements of the designs from the book by Birgitta Dandanell and Ulla Danielsson, Twined Knitting - A Swedish Folkcraft Technique, which is full of photos of original garments of all kindsThe English translation was published by Interweave Press in 1989, and is out of print, but I've been able to borrow a copy from a friend.  

The yarn for both pairs of mitts is Debbie Bliss Rialto Heathers, which is a beautifully soft merino DK. The colour is Pebble - a lovely silver-grey, very like aspen bark. (There's also a little bit of black for the cast-on, and the plaited braid.)  Twined knitting in DK yarn gives a very thick fabric - these mitts are very warm and cosy.

I've now knitted two pairs of mitts and two and a half pairs of wristlets in twined knitting.  (I wrote about the 'half pair' here.)   I made one pair of wristlets for the workshop - a refinement of a previous pair, which I haven't shown.  Here it is:

 
 I have a cardigan in the same dark teal colour, so I've worn these wristlets quite a lot - they really help to keep you warm.  For the workshop pair, I dropped the third colour for the cast-on edge, and the plait - I wanted to keep casting on as simple as possible.  

  
I think I've done enough twined knitting for now.   I like the effect very much, but it's slow to do (because you have to keep stopping to untwist the yarn) and you don't always want your knitting to be thick and wind-proof.  I'm doing the workshop for the Birmingham branch in April, so that might inspire me to take it up again, but at least until then, that's it for twined knitting.  

Wednesday, 11 January 2017

Twined Knitting in Sheringham


Last weekend I went to Sheringham youth hostel for a knitting weekend.  As last year, it was organised by the Leighton Buzzard branch of the Knitting & Crochet Guild.  The weather this year was different, though - damp, misty, quite mild, no wind.  Sea and sky were almost indistinguishable.  But a knitting weekend doesn't need sunshine and we had a very good time.

On the Friday and Saturday evenings, we sat in the lounge and knitted, had excellent dinners provided by the Youth Hostel staff, and did more knitting.  And lots of chatting.

On Saturday morning we went to The Mo, the Sheringham museum, on the sea front.


It is not open to the public in the winter, but we had a special tour behind the scenes.  The museum has recently been extended, thanks to a lottery grant, and we were shown how the new storage areas are being used.  We saw some wonderful ganseys, too - some modern ones that we could handle, and others from the museum's collection.  One particularly fine gansey dates from the 1950s - the knitting is meticulously neat, with 14 stitches to the inch, I was told.  (Didn't manage to get a decent photo, I'm afraid.)

 In the afternoon, we had workshops back at the Youth Hostel.  I repeated the twined knitting workshop that I did for the Huddersfield branch of the Guild in December.  (And never got around to writing about - Christmas got in the way.)   I had designed a wristlet to knit in two colours of DK.  (There was also a flat piece, that you could think of as a coaster, for those people who couldn't manage knitting in the round.)  


I didn't know anything at all about twined knitting before I found that I had somehow volunteered to lead a workshop for the Huddersfield branch.  It was originally scheduled for April 2016, but postponed due to my argument with a ladder.  So I've been practising twined knitting for quite a while.  Looking back, I see that when I knitted a cuff or wristlet in twined knitting in March last year,  I said here that I didn't want to knit a second one.  But since then, I've got more enthusiastic, and I decided that over the weekend I would knit something a bit bigger, just for me.  Over the weekend (including the long train journeys there and back)  I worked on a pair of fingerless mitts.  Not in two colours this time, but using the two ends of one ball of yarn.  I love the effect of two-end knitting and the surface patterns you can make.  The mitts are going to be very warm and cosy.  More when I have finished them.


Thank you very much, Brigitte, for organising another really enjoyable weekend.


Friday, 20 May 2016

Orenburg Lace


Yesterday evening, we had the monthly meeting of the Huddersfield Knitting & Crochet Guild, and I managed to get to it (with some help).  The theme of the meetings this year is 'Around the world in knitting and crochet', and yesterday we were in Russia.  Marie had done a lot of research (and a lot of work) on Orenburg lace shawls, and gave us a fascinating talk on its history.  She had bought a hank of Volgograd goat down yarn to show to us, and had acquired a sample of the original goat down - you can feel how warm and light it is just by letting it sit on the palm of your hand for a little while.  (Or so I'm told - the palms of my hands are still covered by the casts on my wrists, and it doesn't work quite as well on fingers.)  To make the yarn stronger, it's plied with another fibre - silk for the finest shawls.

Marie talked about the construction method used for the shawls: you knit the bottom border first, in a long strip;  then turn the corner, and pick up stitches along the straight edge of the border; then knit the centre of the shawl and the left and right borders all together, side to side; then turn the corner at top right and knit the top border, taking in the stitches from the top edge of the centre part as you go.  then finally at the top left corner, you join the top border and left border by grafting.  Not the grafting that you use on sock toes (aka Kitchener stitch), but Russian grafting.  Which was amazing to me, because I wrote about Russian grafting on this blog way back in 2010.  I had never heard of Orenburg lace back then, and it never occurred to me to wonder what Russian knitters might use Russian grafting for - I just thought it was a really neat way of joining shoulder seams (which it is).   But it is also (and I suppose originally) used for finishing Orenburg lace shawls.

Marie talked about the traditional motifs used in Orenburg lace, and had knitted a lot of samples to show them. The samples are constructed in the same way as a full-size shawl, with a border. Most of them were knitted in Rowan Kid Silk Haze, including the rectangular one at top, and this one with the lovely chain of hearts motif.

Chain of Hearts sample
 
And to emulate the finest Orenburg shawls, Marie had knitted a sample in an incredibly fine yarn -  Heirloom Knitting's Ethereal CashSilk (70% cashmere, 30% silk).  There are 1500m. of yarn in a 25g ball,  amazingly - it's finer than sewing thread, and I don't know how it's possible to knit with it. But evidently some people can, including Marie.  (Ethereal is an apt name, I think - "Extremely delicate and light in a way that seems not to be of this world".)

Lace sample in Ethereal Cashsilk 
It was a great evening - I'm so glad I managed to get to it.  Thanks very much to Marie for a fascinating talk, and for all the work she had done beforehand.

Monday, 28 March 2016

A Twined Knitting Cuff

I haven't written for a while - I just haven't been in the mood.  Sorry about that.

But I've been knitting, of course.  What I'm knitting at the moment is a birthday present, so I can't write about that.  I'll write instead about a couple of things I finished a little while ago that were practice pieces for a workshop I am doing next month on Swedish Twined Knitting.  I wanted to design something small that would show the techniques and a few different stitches.  Twined knitting is traditionally worked in the round (and I think is better done that way), but for people at the workshop who would prefer to knit flat I have devised a small sampler that might be construed as a coaster - I'll show that later, maybe.  And the smallest useful thing I could think of that's knitted in the round, and would show off the fact that twined knitting is dense and warm, is a cuff or wristlet.   So here's the one I've made:


In twined knitting, you knit with two strands of wool, alternating after every stitch.  My first practice pieces had both strands in the same colour, but for the cuff I was experimenting with two different colours. It's also, I've read, traditional to use a contrast colour for the cast-on, and then to make a braid with the cast-on ends rather than sewing them in, so I've done that too.

You can make patterns if you're knitting with two strands of the same colour with purl stitches on a stocking stitch background, and I tried that in my cuff.  Oddly, although the white purl bumps show up reasonably well on the grey/white background, grey purl bumps don't at all - having tried that, I unravelled it.

The inside is very neat, and shows how you always take one strand over another in the same direction, which gives twined knitting its thickness and stretch - and results in the two strands getting twisted (or twined) together, so that you have to keep stopping to untwine them.    


And here's a slightly strange shot of an upside-down cuff, showing the cast-on edge, with black yarn.


Do cuffs normally come in pairs? Perhaps they should, but I'd get a severe case of  'second sock syndrome' if I knitted another one of these.  I like it very much, but it was intended partly as an experiment to see what twined knitting looks like in two colours, and I don't want to repeat it.  But I have a good reason for only knitting one:  I have a sweater I bought this winter that I like very much, and a cuff (one cuff) is just the thing to go with it.      


It's an asymmetric design, with seams in odd places, and pieces knitted sideways, and you can see that the cable pattern on the front is asymmetric.  One sleeve is cabled, with a moss stitch top, and the other is in fisherman's rib with a stocking stitch top.   It's so asymmetric that one sleeve is longer than the other. (I'm not sure if that's intentional, but I've decided that it's a design feature.)  I've been wearing the longer sleeve turned up, to even them out - and now I can wear my one cuff on the other sleeve.


Monday, 23 November 2015

It's An Illusion

Last week we had the monthly meeting of the local Knitting & Crochet Guild branch, with a workshop in Illusion Knitting, aka Shadow Knitting.  It was led by Ann Kingstone, one of our members, who had designed a square for us to knit, with a pattern of a star.  The star is more or less invisible when looked at straight on, lit from in front (or in a flash photograph) but appears when the square is lit from the side and/or looked at from an angle.

No star

Star lit from the top 

Star seen at an angle

I started my square with a provisional cast on, to allow for picking up stitches all round to add a border, as Ann suggested, but I haven't decided yet what to make from it.

To introduce us to illusion knitting, Ann had brought a shawl that she was given by Steve Plummer and Pat Ashcroft  of Woolly Thoughts - it has a portrait of Robbie Coltrane as Hagrid in the Harry Potter films knitted into it.

Hagrid shawl, from http://www.illusionknitting.woollythoughts.com/hagrid.html 
At the workshop, we were wondering where the idea for illusion knitting came from - it seems such an unlikely technique to invent from nothing.  Later, I looked in Vivian Høxbro's book Shadow Knitting.  She says that first came across the idea in a translation of a booklet by a Japanese woman, Mieko Yano - a similar account is given on a blog by Mrs Petersson here, who says that Mieko Yano was teaching illusion knitting and other Japanese knitting ideas in Sweden in the 1980s.   But I don't know if Mieko Yano invented the technique, or whether it was developed earlier in Japan. Intriguing. 


Wednesday, 21 October 2015

Knitaway in Blackpool

Last weekend, I went to Blackpool for a knitting weekend with eight friends from the Huddersfield branch of the Knitting & Crochet Guild.  It was great - we had a wonderful time.   Lots of knitting , lots of chatting,  and we were really well looked after by Paula Chew at the Westcliffe Hotel.   (Not to be confused with the Westcliff Hotel, Blackpool, which proclaims "we welcome stag and hen parties".)  

Paula runs knitting holidays where she provides workshops, yarn shopping trips and other knitty activities, but we did our own workshops.  Marie led a workshop on brioche knitting (a re-run of the one she did at the Guild Convention in July, since none of the rest of us had been to that one).  We worked through a small brioche project - either a cup-holder or a wrist-warmer.  Mine's going to be a wrist-warmer.

My brioche knitting, warming my wrist

Margaret taught us how to do entrelac, which I have not tried before. The project Margaret set us was a small pouch (for stitch holders, or whatever), though I haven't got mine finished.  I'm glad to have tried entrelac - I hadn't realised before that the individual rectangles are not square.  In the pattern we were following, they are 10 stitches by 10 rows, but stocking stitch is wider than it is long.  So the woven effect is partly because the rectangles don't want to lie flat.  Not a very profound observation, but something I didn't know until I tried it.

Entrelac in progress 

I did the third workshop, on slip-stitch patterns.  I had swatches of 8 or 9 stitch patterns, some in just one colour and some in two colours, swapping after every two rows, so that people could try any that they liked the look of. I had borrowed a linen stitch scarf from my friend Steph, with the colour changing every row, which looks wonderful. But although linen stitch can look very good, it is a lot of work - it is very compact and dense.

Linen stitch swatches and scarf

I also took my Old Moor sweater that I knitted four years ago, to show the bands of Woven Transverse Herringbone - another stitch that is a lot of work, but can look very good.

Detail of Woven Transverse Herringbone in Louisa Harding's Old Moor 

Some of the other stitch patterns I had found give a lovely thick soft fabric, and there are some nice effects in two colours.  Marie made a little bag (for her car keys?) in Slip Stitch Honeycomb - a very pretty pattern in two colours.
  
Marie's Slip-stitch Honeycomb bag

Slip-Stitch Honeycomb is one of my favourites, too - I wrote last week  about a test piece for a cushion, which in fact uses both sides of the stitch pattern.   One side looks better in two colours, but the other side looks better if you're only using one.  And I've made a lot of progress with the full-size cushion:

Slip-stitch Honeycomb cushion, in progress

 So we sat in Paula's lounge and knitted and chatted and were offered tea, coffee and food regularly.  And there are current knitting magazines to read, and knitting books everywhere. And Paula has a little shop at the front of the hotel, so that if you haven't got the right needles or need some nicer ones, or run out of yarn, they are right there for you.  (Four members of the party spent a lot of time discussing the Opal Yarns Advent Calendar in the shop, and finally devised an incredibly complicated way of sharing it, involving drawing lots for the individual days, setting up a Facebook group, and rendez-vous every week during December to pass it on.)

And to get the full sea-side experience, Paula sent us off to a fish-and-chip restaurant on Saturday night, Seniors in Thornton, which won "Best Fish and Chip Shop in the U.K." in 2012.   (I don't actually like fish-and-chips, but it does other fish dishes too which are very good.)

We didn't see very much of the sea, although the sea front is only 100 yards from the Westcliffe, but I did go for a walk along the promenade on Friday afternoon, and set foot on the beach - if you 're at the sea-side, you ought to go on the beach if you can.  It was almost empty, apart from a man fishing at the water's edge.  


And of course, the Blackpool Illuminations were on.  They have been an annual event for a long, long time - I remember seeing them when  I was a child.  There are 6 miles of them along the sea front, though I only saw a short stretch near the hotel, with some of the tableaux  - moving images made by light bulbs going on and off.  Some of them seem similar in style to the ones I saw decades ago, though I remember them being all in white, rather than colour.  


The Blackpool trams run along the sea-front, next to the tableaux, and one or two of the trams are also illuminated.

Illuminated tram

It's a very popular event  - quite odd, in these days of amazing CGI effects.  There are slow-moving cars driving along the promenade all evening, as well as people in the trams and walking.  (Although most of our party preferred to stay in the hotel with a bottle of wine, knitting.)

The promenade, with Blackpool Tower in the distance

Altogether, it was a really good weekend.  We are already planning next year's Knitway at the Westcliffe.  Thanks very much, Paula.

Thursday, 1 October 2015

French Knitting

Stitchcraft was a monthly magazine published by Patons & Baldwins that first appeared in October 1932.  In the first few years, the magazine had a Paris correspondent, Ann Talbot, who wrote every month about the hand-knitting and crochet in the models designed by the Paris fashion houses. (Not just sweaters and accessories - evidently a lot of the dresses were hand-knitted in the 1930s.)  I have been looking through her articles in the early issues of Stitchcraft in the Guild collection, for a piece I am writing for the Guild magazine.  In the May 1933 issue, a paragraph  on what Ann Talbot calls cotton-reel knitting caught my eye - it's what I used to call French knitting and we now call i-cord:
Old-fashioned tubular cotton-reel "knitting" is being enthusiastically revived in Paris at the moment. Charming accents of colour are achieved by trimming with this original handwork. Quite a brisk, military air is given to a navy woollen frock by the epaulette trimming of two rows of cotton-reel tubing, one red, the other white, along the top of each shoulder. Wool fringe in red and white is frayed out at each outer end of the tubes. Cuffs and necklines are effectively trimmed in this way, and belts of varying widths, depending upon the diameter and number of tubes used, give an unusual touch to sport coats and frocks. Striped and plaid effects are frequently worked into a tube, for both stripes and plaids are very much to the fore in the new collections. 
And here is Ann Talbot's drawing of two of the outfits, including the frock with epaulettes that she describes:


I think that the two rows of tubing above the elbow look a bit daft, actually, but never mind.

I explained here how we used to do French knitting using a cotton reel.  It's interesting that Ann Talbot calls it old-fashioned - and I wonder when it started to be called French knitting.  I-cord, which is instead knitted on a pair of double-pointed needles, produces the same effect (more quickly). Elizabeth Zimmermann gave it the name i-cord (for idiot cord, because it is easy to do).  She always claimed to have 'unvented' or re-discovered any apparently new technique (not because she knew of an earlier source, I think, but because she thought that it was impossible to invent an entirely new idea in knitting).   Several websites suggest that she did invent the technique of producing a cord on two needles, but Jean Greenhowe tracked down an early description in a book printed in 1856, in an account of how to knit stay-laces - see here.  So EZ did unvent the i-cord technique, rather than inventing it.  

Anyway, back to Paris in the 1930s.  I imagine that the cords decorating the two models illustrated are sewn in place.  These days, if we used i-cord around a neckline, it would more likely be knitted in place, e.g. by picking up stitches around the edge and knitting them into the i-cord.   For instance, Ann Kingstone's Wetwang sweater has applied i-cord at the top and bottom edges of the yoke.   In  spite of Elizabeth Zimmermann's nothing-new-in-knitting theory, I do suspect that someone invented applied i-cord, fairly recently - don't know who or when though. Any information gratefully received.

Sunday, 20 September 2015

Cast Away!

Last week, we had the monthly meeting of the Huddersfield Knitting & Crochet Guild branch.  The theme this month was casting on and casting off, hence the title: Cast Away!  (It works better in British English than American English, where the theme would be casting on and binding off.)  Angharad taught us some specialised methods, including tubular cast on.  That's a method that I have heard of and wanted to learn, but it sounded far too complicated.  But now I've tried it, and my cast-on edge is very neat - I feel quite proud of myself.

The first photo shows the tubular cast-on still with its provisional few rows of stocking stitch in waste yarn which you use as the foundation - the second row shows the finished edge after the waste yarn is removed.


I am sure that I have seen tutorials on tubular cast-on in magazines and totally failed to make head or tail of it, but with Angharad showing us how to do it, it turned out to be very straightforward.  And she directed us to this YouTube tutorial by Eunny Jang as backup:


It makes a very stretchy start for single rib (and that's what my swatch is).   And there is not a definite edge as there is with the usual cast-on methods - it almost looks as though you just leap into knitting single rib with no preamble.

I finished off my swatch with tubular cast-off - Angharad's instructions were based on Montse Stanley's The Hand-Knitters Handbook (which I have).   It's a sewn cast-off, and I found it not so easy to keep the edge even and neat.  Needs more practice.  


Angharad also covered grafting and three-needle cast-off, but I decided that successfully learning one new cast-on and (not so successfully) one new cast-off was quite enough for one evening.  In any case I have done a three needle cast-off before.  I was even wearing an example (the shoulder seams of my Boardwalk pullover) - although I didn't remember that until much later.

Altogether a very productive meeting.  Next month:  Granny squares.  

Monday, 13 July 2015

My Mary Quant Sweater

I finished sewing up a sweater just before the Knitting & Crochet Guild Convention, a couple of weeks ago.  In fact, I started it more than two years ago, in 2013.  I got most of it knitted that summer, and then put it away for the winter, because it's a summer sweater.  I didn't get it out again until this year, and then it sat for a while waiting to be sewn up.  But now it's done, and I've worn it, and it's turned out very well.


It's from a pattern leaflet designed by Mary Quant in 1965, in a collection of about 27 designs that she did for Courtelle knitting yarns (though I knitted it in cotton -  DMC Natura, which is 4-ply/fingering weight).   It appealed to me because it's a neat little sweater in an interesting stitch pattern (it's knitted in a twisted rib), and I like the neckline.

Lee Target 6565
The rest of this post is technical stuff about the details of the original design and the changes I made.  So if you're not a knitter (and assuming that you've got this far), you might not want to read any further.

The stitch pattern is a knit 3, purl 2 rib, but on right side rows you knit into the back of the knit stitches so that they are twisted. The twisting tightens up the knit stitches, though overall the fabric is still very stretchy. The hem and cuffs are done in the same stitch, but on smaller needles. I think it's a really nice effect - the twisting gives it a lively texture.


The neckband is knitted in twisted garter stitch, which I had never met before.  Unlike the twisted rib, the twisted stitches aren't evident, on either side of the work, but they give a much tighter fabric than plain garter stitch, and so a firmer neckband.

I made a few changes to the pattern:  I made both sleeves and body longer. In the original pattern, the sweater was intended to finish more or less on the waist.  The only shaping came from some increases at the sides after the first 6 inches of knitting the body.  I wanted my sweater to be longer, so I needed it to be hip-width around the hem.   So I started with more stitches than in the pattern, and then decreased for the waist.  But rather than putting the decreases at the side seams, I concealed them in the rib: I put the extra stitches in the purl ribs and then gradually removed them.  It's a very neat way of increasing and decreasing when you're knitting a rib stitch. The decreases are hardly visible on the right side, even if you know where to look, though they are more obvious on the wrong side.    

Waist shaping on wrong side

I didn't do any increases above the waist - I decided that the stretchiness of the fabric would be  enough.  And it is.

It looks good, it's nice to wear.  I like the fact that it 's a cool and trendy Mary Quant design (only 50 years late).  Now for my other unfinished projects....    


Related Posts Plugin for WordPress, Blogger...